


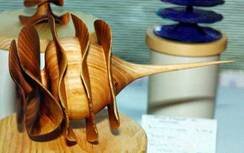
Our featured demonstrator for the June 23rd meeting is Melvyn Firmager. He comes to us from Stoughton Cross, Somerset, England where he teaches woodturning and has a bed and breakfast in an historic building and grounds called Nut Tree Farm. Melvyn is demonstrating at the 2007 AAW symposium in Portland, OR. Check the AAW 2007 Symposium web site for more information. He was a demonstrator in the 1998 AAW symposium and one of the free form pieces called “Sea Flower” for which he is known was in the Instant Gallery (Look at the 13thphoto in the series).
On his way to Portland he will do an all day demo for us at Levi’s shop from 9am till 4pm. The fee for this special club demo is $35 for members and $45 for guests and includes lunch. His demo will include side grain and end grain pieces, usually with small necks and flared rims often with thin walls. Multiple-rim “Sea Flowers” type turning is also a possibility. He is known for his ability to teach technique while demonstrating, instead of fast moves to impress. His work has been featured at many galleries thru out the world and I have seen his work at thedel Mano Gallery in west Los Angeles. If you Google him you can see some of his work. Joe Levy, program chair
The May meeting was a Hands-On turning session at Oxnard High School and was well attended. The April meeting featured our member Joel Oksner demonstrating how he makes Baby Rattles. At the April meeting Tim Albers brought avocado wood again (remember to make bowls for him!) and Oxnard High School student David Pantoja was presented with club membership and materials and tools to help with his pen making project to earn money for college. Photos from the April meeting are below.
Save the date of July 7th for our annual potluck picnic for members and spouses at the Rinde’s home . Members will be contacted shortly with details. The membership directory was sent by email to all members by Ron Lindsay last month.
The Ventura County Fair is coming up quickly with the new link on line now. The Fair runs from August 1-12 this year. The pdf file for the entry guide is available at Entry Booklet with the Division 345 Woodturning on page 47. Start getting your work ready to enter. We will be sharing space with the Wood Carvers and Boat Builders again this year with a newly designed booth. Sam Turner will be our contact with the Wood Carvers and he will be calling our membership to help with the construction of the booth the weekend before the fair opens.
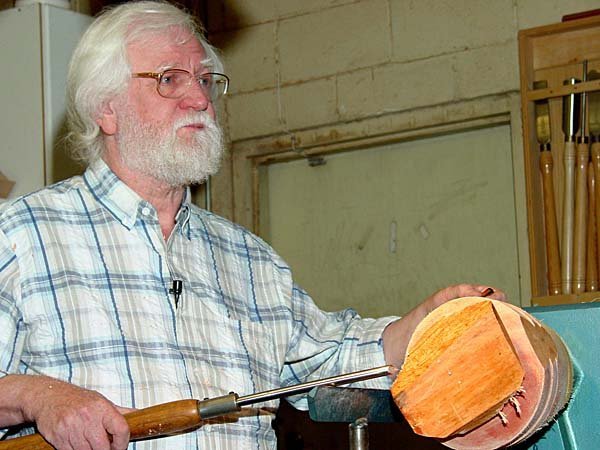
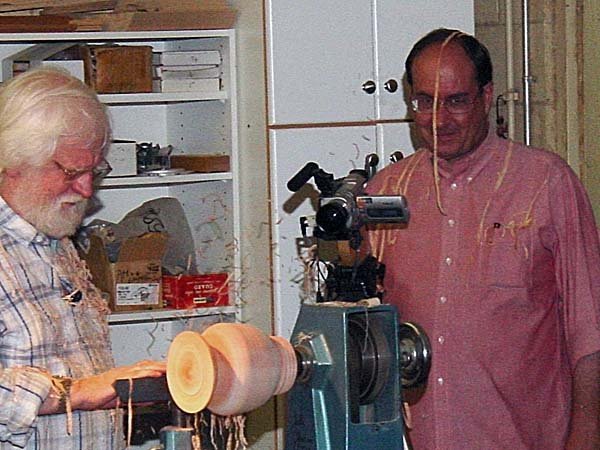
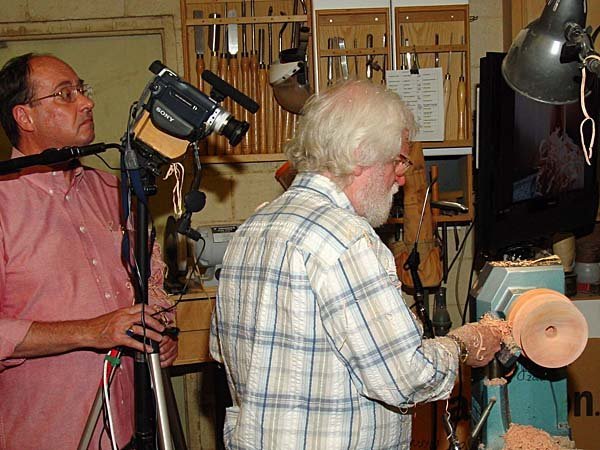
At the June 23rd, 2007 meeting the Channel Islands Woodturners hosted Melvyn Firmager for an all-day teaching demonstration. Melvyn hails from Stoughton Cross, Somerset, England where he teaches woodturning at his school and has a bed and breakfast in historic buildings and grounds called Nut Tree Farm. He is famous for his unique turned shapes called “Sea Flowers” and objects with distorted and straight multiple rims. Melvyn is a sculptural wood-turner, working mainly with green (wet) wood allowing it to take on its own material form as it dries. He has developed special tools and techniques which allow him to work through small apertures in order to make hollow objects with very thin walls.
Melvyn emphasized that the way he turns takes the strain and tension out of turning and makes it great fun and a truly therapeutic activity, and gives you the opportunity to become a most successful turner, all the way to professional standards if you wish to go that far.
Insights
Key points that Melvyn conveyed to the club were:
Balance
Positioning Height
Long Tool Handles
Short-bed or zero-bed lathes like the VB
Faceplate chucks
Firmager tools
He stated that you should have good balance of your body on your feet during turning, enabling you to shift your weight from one foot to the other as you “glide like a dancer” around the lathe.
Your spindle centerline height should be approximately at elbow high, allowing your body to relax while turning. This will minimize tension in your upper body, i.e., shoulders, neck, and back.
He advocates the use of long tool handles that can rest against you body for stability, taking the strain off your arms.
One of many things that impressed me about Melvyn was how often and with such ease he switched from left handed to right handed tool holding positions based on which side of the cut he was approaching. Definitely an interesting and excellent discipline to force one’s self to learn.
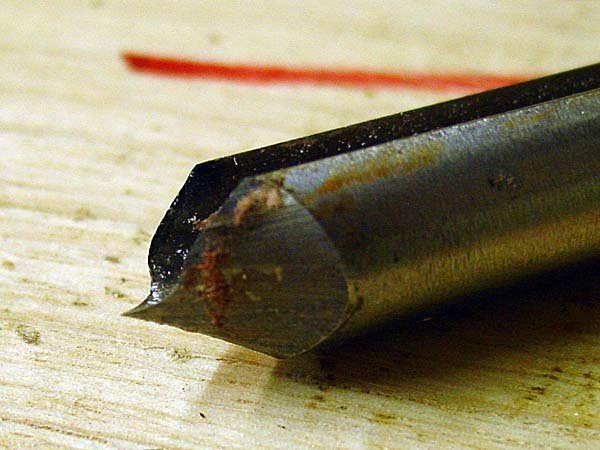
Nib Gouge
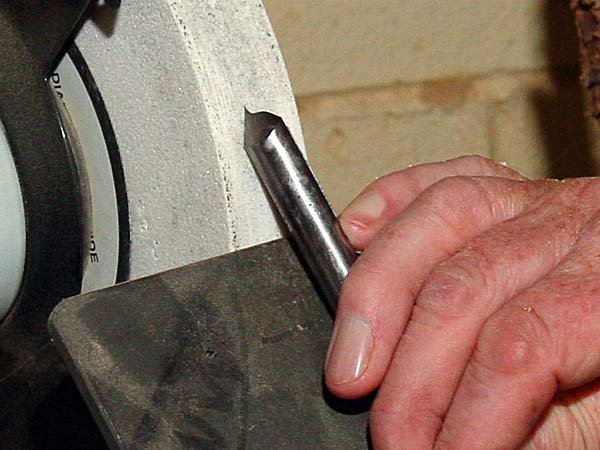
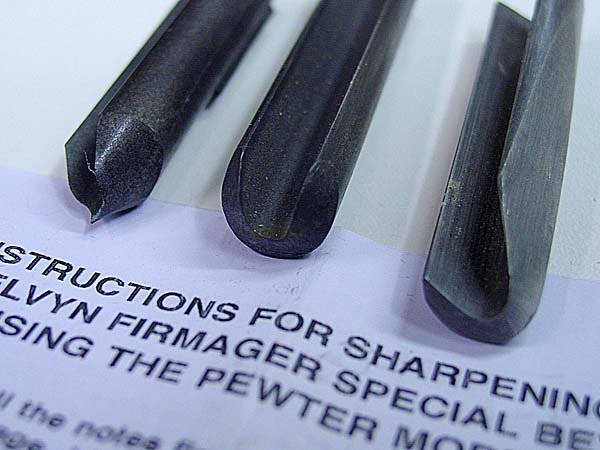
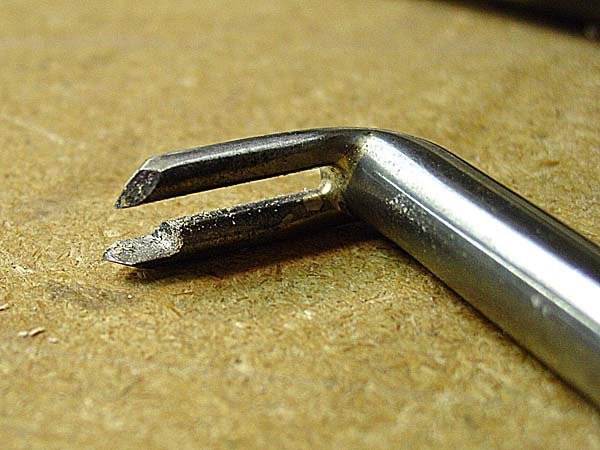
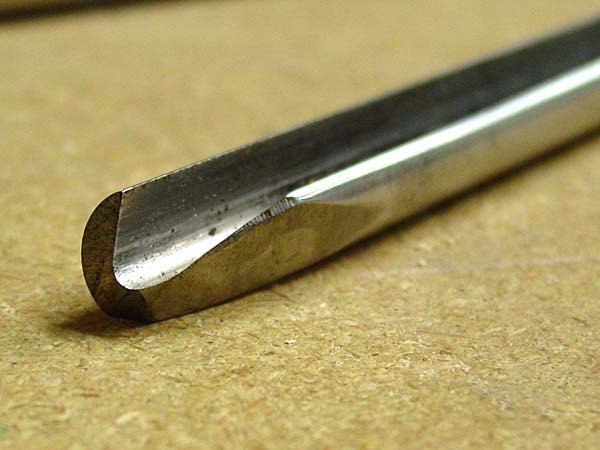
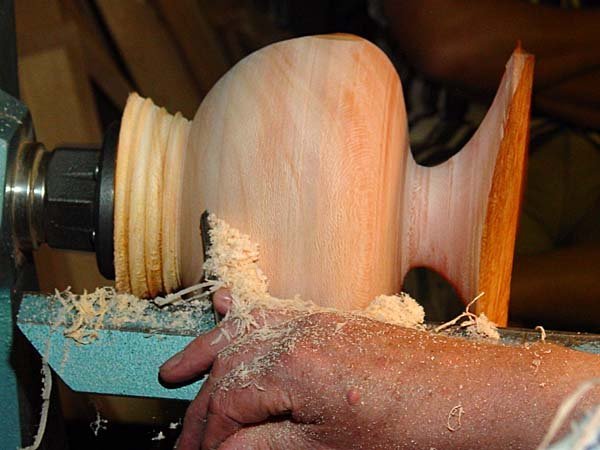
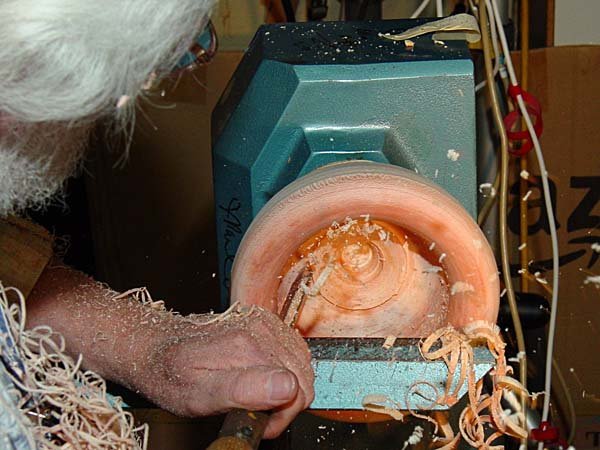
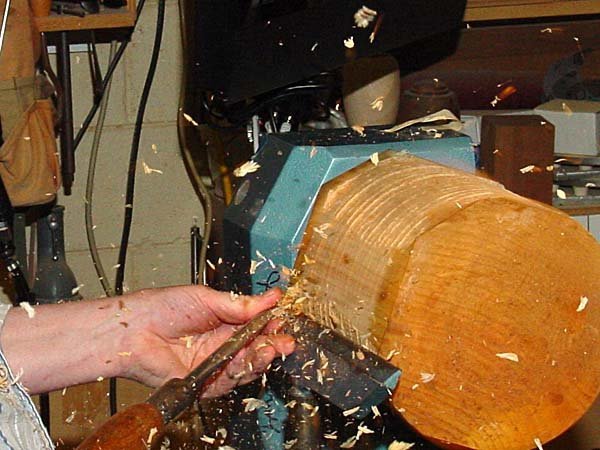
Melvyn’s favorite and most universal tool by far is a modified ground bowl gouge he calls the “Nib Gouge” (photo 03 below). Named after, and similar in shape to the quill or nib of a fountain pen, it is like six tools in one; a bowl gouge, shear scraper, boring tool, roughing gouge, skew chisel, and a spindle gouge. He demonstrated aggressive roughing work (photo 12) with the Nib Gouge as well as gentle finish work. During roughing, the nib of the gouge remains slightly embedded in the cut helping the gouge to remain in contact with the wood at all times. The varied ground surfaces of the Nib Gouge are what make it so universal. No doubt it will take some practice to master using the Nib Gouge. Based on the cut to be achieved, Melvyn used a lot of different penetrating angle and rolls as the contour of his piece dictated. One is able to do wonderful finish shear scraping as well with the Nib Gouge (photo 08). As a true convert to the Nib Gouge, later that evening I ground my best bowl gouge with a nib and gave it a whirl on a piece of eucalyptus. I had enough success from the first go-around to be a believer. I’ll need to perfect the grind and it would certainly be useful to get a set of the cast pewter models Melvyn sells of the custom Nib Gouge, Scrapey Gouge, and Swept Back Gouge (photo 07) as a visual reminder (photo 05).
Hollow Forms
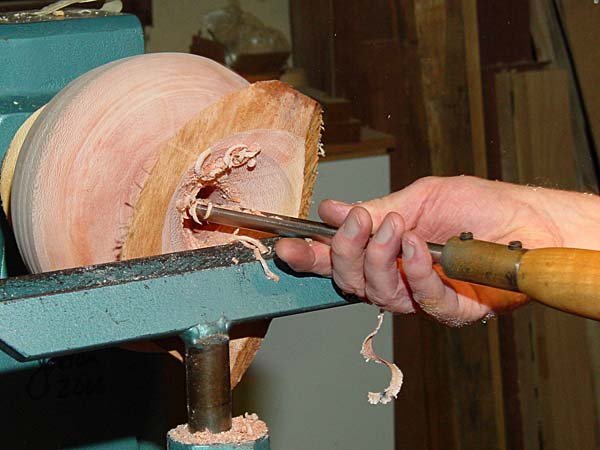
Melvyn did a lengthy discussion on how he approaches hollow vessel work. He turns the outside of the vessel relying mostly on the Nib Gouge and the popular Irish grind gouge (Fig. 2). For the hollow of the form, he has special tools and grinds that he has developed. He used the Nib Gouge to bore the entrance hole in his hollow vessel and employs a Scrapey Gouge, Swept Back Gouge, and a double-pronged Angle Tool to get the material out and finish the inside of his hollow forms.
Fig. 1 shows the zones in a hollow vessel and the tools used to remove the material. His angle tools were quite interesting in that they have a double prong (photo 06). The prongs are not the same height, one is ground slightly back. This allows both prongs to be engaged on the cutting surface at the same time. This creates a very stable cut; in fact with a long handle and the double prong Melvyn does all of his hollow vessel work hand-held (no hollowing rig used). This goes for the Scrapey Gouge and the Swept Back Gouge as well. The double-pronged Angle Tools are custom made by Melvyn and can be ordered through him at his website www.melvynfirmager.co.uk , through e-mail at m@melvynfirager.co.uk or by phone (international) +44-1934-712404.
Besides the long-handled tools he uses for stability, he has invented an attachment to the tool rest to allow for even more stability while working in the vessel. It is a pin that screws perpendicularly in to the tool rest (Fig. 3). He wraps his thumb and two upper fingers around the tool and his two lower fingers around the pin.

Fig. 1
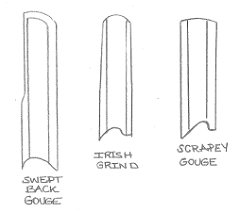
Fig. 2
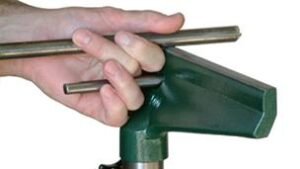
Fig. 3
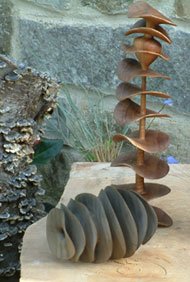
Multiple Rims
Melvyn demonstrated his techniques for doing multiple rim designs which includes but is not limited to his Sea Flowers. His woods of choice for these forms are Eucalyptus (because it distorts) and English Yew.
It is amazing to learn that he turns these without the aid of a tailstock. In fact, they get so delicate that even light pressure from a tail stock would be counter-productive. The form must be done in stages from top to bottom, keeping enough structure at all times so the piece will stay together. They must be kept wet at all times, Melvyn likes to keep a bucket of water by the lathe and do a full emersion every so often. It is essential that the spacing between rims is aesthetically pleasing and that the thickness of the rims is kept uniform and dimensionally symmetrical or else – when the piece distorts during the drying process – the form will not look quite right. He also wet sands on the lathe and has built his own rig that incorporates misters above providing a constant wash to the piece while sanding. He uses a trough to catch the runoff and a plastic shield to keep the thrown water at bay. He wears rubber gloves to prevent the wet abrasive from wearing trough his skin.
Scraping Parting Tool
Another great tool he demonstrated while cutting the multiple rims is a long narrow Scraping Parting Tool. It is 1/16” thick by 11” long while the tip is shaped for parting, the hollow-ground wide curved edge section for shear scraping (see drawing below). It is great for cutting between the rims and finishing the bottom of his pieces. Since Melvyn works almost exclusively off of a face plate, this tool is essential for the final bottom cut.
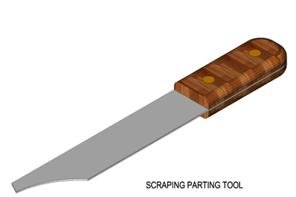
Fig. 4

Fig. 5
[Ron Lindsay adds: The parting edge ‘b’ (as shown in Steve’s drawing) is not hollow ground in the usual sense. I think the term Melvyn used was “fluted”. The flute is formed using the corner of the grinding wheel. He called it a rouge wheel I think. He had a variation on this tool with the parting cutting edge convex instead of concave, this to provide a tight radius in the corner where the wing/rim meets the body. Also the radius ‘a’ would be 3 inches (vs. 4) for a 6-inch diameter grinding wheel. Melvyn holds the tool with the curved side up to shear scrape with the side of the large curved section against a curved outer surface of the turning.] This is done with the tool below center sort of like a negative-rake scraper; NOT from above center as is done with the long edge of a swept-backed bowl gouge which is pulled forward [DF].
Finishing Touches / Drying
For drying, he microwaves his multiple-rim objects letting them heat up for a minute more or less and cooling completely between cycles. His goal is to have the piece distort beautifully but if an area is not shaping as desired, Melvyn will put the piece back in water and microwave again and straighten by hand as necessary. He likes to finish his works with mineral oil (called liquid paraffin in the UK) and follow with a wax polish such as Mylands Clear Wax.
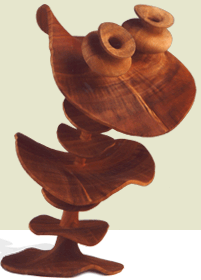
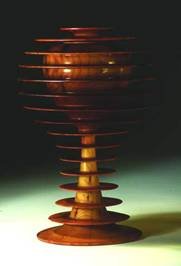
Sea Flowers
Summary
Melvyn’s innovations are evident in his use of special tools, grinds, and turning technique. He has challenged the “you can’t do it that way” of thinking and has become a master at his art. It was a privilege to watch his demonstration. He was engaging and has a great sense of humor and a passion for sharing and teaching his craft.
Melvyn swears by the VB36 Master Bowlturner lathe. He states “this is the finest bowl and vessel lathe ever made and a dream for beginners and the more experienced alike.” Since it has no bed extending from the column that supports the spindle (headstock), you have accessibility to walk (or “dance”) completely around your piece. This greatly enhances the tensionless and relaxed approach Melvyn regards as key to successful woodturning.